OK, I know, this is hitting a planet or two, or three, where some of you just looked up from your basement and said, “HUH?!” As many of you know, I am somewhat into cycling and recently got a cyclocross bike. Cyclocross is like taking road cycling (you know, the type that Jens Voigt does. You don’t know Jens? Jeesh, how about Lance Armstrong?) and mountain biking, combine them in a road bike like setup, and race off-road. During a race you have to dismount the bike and jump over barriers or bunny hop over the barriers (just hope you don’t pull a Todd Wells).
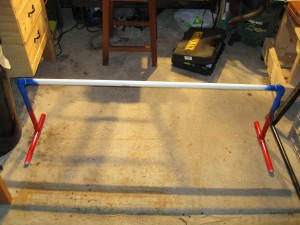
In order to train for cyclocross you really need a barrier, or two, to jump over. Now, when you are training, you don’t want to have to lug around big wooden barriers, you want something more portable. Because of this, I Googled “diy cyclocross barrier” and got a few results. All were pretty much the same, and there was typically two variations of the design. I chose the design that would make the barrier stand up, but if you were to kick it while jumping, you wouldn’t trip and kill yourself. UCI and USA Cycling both state that 40cm is the maximum height of a barrier, or for you American turkeys (me included), that is approximately 153/4 inches. So, without further ado, here is what I created in less than 30 minutes with a whopping $3.06 USD with tax:
Cyclocross Barrier Hardware List (purchased from Lowes)
- 1x ¾ inch by 10 feet Schedule 40 PVC pipe (Lowes Item #23971) – $1.65
- 2x ¾ inch Schedule 40 PVC Tee (Lowes Item #23874) – $0.66 each
- 2x ¾ inch Schedule 40 PVC Elbow (Lowes Item #23868) – $0.52 each
I used a pipe cutter similar to this one at Lowes. That is it, nothing other than my hands for this one. You could use a hacksaw, or heck, even a really sharp knife. The reason I didn’t use a saw of some sort is I didn’t feel like de-burring or sanding the ends that I cut.
Cyclocross Barrier Setup
- Cut off a 4 foot piece out of the pipe.
- Cut 2 pieces 13¼ inches long.
- Cut 2 pieces 8 inches long.
- Cut 2 pieces 4 or 5 inches long, your choice on this one.
- Attach the elbows to each end of the 4 foot pipe.
- Attach the other end of the elbows to the 131/4 inch pipes.
- Attach a tee to each end of the 13¼ inch pipes.
- Attach each 4 or 5 inch piece to the same said of each tee.
- Attach each 8 inch piece to the other side of each tee. This way both 8 inch pieces are on one side, and the 4 or 5 inch pieces are on the other side.
The side with the 8 inch pieces is the front, or the part you will dismount your bike and run towards. The side with the 4 or 5 inch piece is the back of the barrier. This way here it stands up straight in the grass, yet will topple over if kicked or tripped on, hopefully keeping your face and body off the ground. The way the legs attach to the elbows and the tees, makes the 4 foot bar portion approximately 40cm high, the maximum height allowed for a barrier. I could make this even more portable by cutting the 4 foot pipe in half, and then using a coupler to connect them when I ready to use the barriers. That would make the largest piece only 2 feet long, and that should fit in almost all backpacks or messenger bags (I can put about 5 or 6 broken down barriers into my Chrome bag).
Have any questions, just ask away in the comments. If I insulted you with my opening statements, then go shave your neck beard, and stop looking at porn or building Ubuntu packages (that was for my buddy Ben!).

